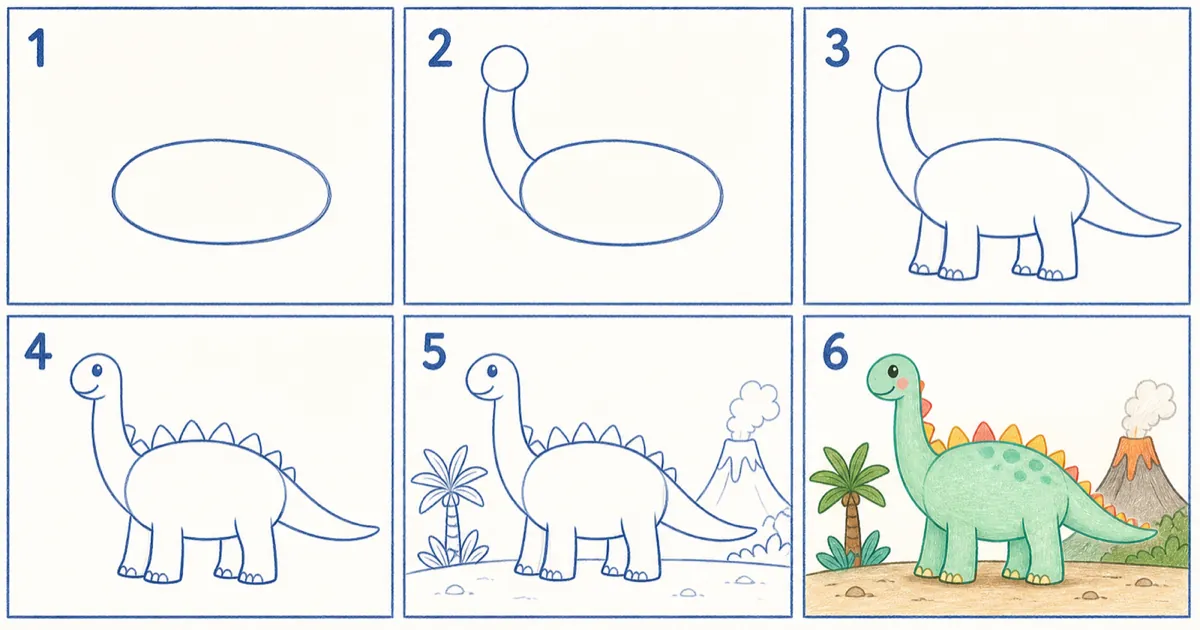
Say the word "dinosaur" near any child and watch their eyes ignite — no creature combines hugeness, mystery, and thrill like the giants of prehistory. And the dinosaur holds one advantage in drawing lessons that no other animal has: nobody has ever seen a real one! So there is no "wrong" drawing whatever your child does — purple? Possible. Blue dots? Maybe they really were! That total freedom makes today the most liberated lesson in the series. We'll draw the friendly long-necked giant (the gentle brachiosaurus), then convert it with small tweaks into other species, and build the volcano world it lived in.
We need a big horizontal sheet — giants need space — a pencil, greens and oranges, and any bold color the artist chooses.
Quick Answer
The easiest child-friendly dinosaur begins with one large body oval, a long curved neck and a small round head. Add four short legs, a sweeping tail and triangular back spikes, then color it green and build a simple prehistoric scene.
What Are the Easy Dinosaur Drawing Steps?
- 1) Draw a huge horizontal oval in the middle of the page, slightly tilted — the body. Make it the biggest shape your child has drawn in the whole series; we're drawing a true giant!
- 2) The legendary neck: from the body's upper front, draw two parallel arcs climbing in a gentle curve toward the top of the page — like a giant slide children could climb. Let the neck narrow slightly as it rises.
- 3) The head: a very small oval at the neck's end — and here lies the entire secret of "giantness": the smaller the head compared to the body, the bigger the dinosaur feels! A dot eye and a small arc smile.
- 4) The tail: from the body's rear, draw two arcs stretching out to meet at a distant point — a long tail tapering just like the neck, balancing the shape like a seesaw.
- 5) The legs: four huge rectangles with rounded ends — bridge pillars, not cat legs — with small arc toenails at each foot's front.
- 6) The back spikes — the final signature: a row of small triangles running from the top of the head along the neck and back to the tail's tip, growing in the middle and shrinking at both ends.
- 7) Skin touches: small circles and ovals scattered on the body — dinosaur spots, with total freedom of shape and color.
The Dinosaur Factory: A New Species with Every Tweak
Now the part that turns one lesson into five — the same oval body with small changes:
- Shorten the neck, enlarge the head, open a mouth with small triangle teeth, and shrink the front arms into two comically short ones — you've got the famous T-Rex, king of dinosaurs!
- Keep the body and add a big half-circle sail on the back, striped with vertical lines — the river spinosaurus.
- Three horns on the head — a short one on the nose, two long ones above the eyes — plus a half-circle frill behind the head like a royal collar: the armored triceratops.
- Two wide wings instead of front legs and a long pointed beak: the pterodactyl soaring above everyone.
Today's loveliest discovery: your child is no longer learning a drawing but a recipe they can cook anything from.
Building the Prehistoric World
- The volcano: a big flat-topped triangle in the background, a zigzag gray smoke cloud above its mouth, and orange lava lines flowing down its side — the most famous backdrop in dinosaur-drawing history, and no child ever tires of it.
- Giant plants: ferns as curved lines fanning from a single point like a green fountain, and trees with tall trunks and a ball of leaves on top.
- A hatching egg: a big white oval with a zigzag crack across its middle and a tiny dinosaur head peeking out — the detail that makes children laugh hardest and drops a story straight into the scene.
Free Coloring and the Naming Game
Today's coloring rule is "no rules": green with orange spikes, purple with yellow dots, blue with rainbow stripes — every choice is perfectly scientific in a world nobody ever saw! Then add the game that makes this lesson unforgettable: every new dinosaur your child invents needs a scientific name of their own making. Teach them the recipe: a word describing the look + "saurus" at the end — drew a pink dotted dinosaur? It's the "Dottysaurus Pinkus"! Long ears? "The Great Earsaurus"! This little language game doubles the drawing fun and opens a bottomless appetite for inventing new species — and your child is now, officially, both a paleontologist and their own illustrator.
Imagination Questions: The After-Drawing Fuel
The dinosaur is an imagination gate that never closes. Once the scene is complete, try these three questions and watch what happens: "if you had a pet dinosaur the size of a cat — what would you feed it and where would it sleep?", "your dinosaur: a plant-eater that munches trees, or does it prefer biscuits?", "what's inside the volcano in your drawing?" Every question may open a whole new drawing — and that's exactly how artists work: one drawing asks a question, another answers.
The Bottom Line
A huge oval, a slide of a neck, a tiny head, and triangle spikes — the result is a friendly giant filling both the page and the heart. Today your child learned the series' two greatest lessons: a small head makes a giant body (proportions create feeling), and one recipe births an entire family of species. Wider worlds of creatures and characters await their imagination in the Rasm Kids course — video lessons that turn every recipe into an adventure.
About Kids Art Academy
This lesson is part of the Kids Art Academy drawing library for children. The academy offers the Rasm Kids course with instructor Majada Al-Shouli, who holds a master’s degree in fine arts and specializes in teaching drawing to children and adults.
FAQs About Dinosaur Drawing for Kids
Which dinosaur is easiest for a child to draw?
A friendly long-neck is easiest because its body is an oval, its neck is one long curve, and its legs are four short block shapes.
How can the dinosaur look friendly?
Use one large round eye, a small smile and light colors. Keep the spike tips slightly rounded.
What age is this lesson for?
The steps suit children ages five and up. Younger artists can skip the background.


